
During the course of this Photoshop tutorial we're going through 9 major steps to create a glass ball. The main goal of this tutorial is that you get an idea how to approach this. It's not that important to remember all settings, but it's more important that you understand what's exactly happening.
The tutorial is divided into 5 main areas:
 We're now going to duplicate our Layer 1.
Click on its icon in the layers palette, hold down the mouse button and drag (A) the layer to the Create a new layer icon and release the mouse button. The next step is to move this duplicate (that has now become the layer with name Layer 1) to the top of our layers palette; click on Layer 1 and drag (B) it all the way up until you notice a dark black line appearing above the top layer. At that moment release the mouse button.
==================================================================================================
Warning for users of Photoshop CS2 or later : it turns out that Photoshop CS2 changes Layer 2 back to a normal layer, one that is not clipped, when we duplicate Layer 1. To correct that make sure Layer 2 is active and press Ctrl + Alt + G (Command + Option + G on the Mac). Again, this should only be done in Photoshop CS2.

==================================================================================================
Make sure that Layer on (our new top layer) is active (you will notice the in front of it).
Set the Fill of this layer to 0% (A) and then double click on the Layer Style icon (B) to modify the Layer Style of this layer:
Use the following effects settings for the layer style. Make sure that all settings are exactly the same, including color or blending mode settings.
Inner Shadow
(pay special attention to the option Use Global Light, because it's not selected! Also notice that we have a black rectangle beside the Blend Mode; double click it if yours is not black, to change its color!)

Inner Glow

After this our image should look something like this:

It's important to know that you have to select a background with colors that are not the total opposite of the colors we selected in the beginning of our tutorial when you want to use this technique. You can make the ball even more realistic by adding more highlights or reflections. For the purpose of this tutorial I've kept it simple by adding just one single highlight.
Also be aware that once you deform the shadow or inside of the ball that you're not able to move the ball, since both deformations are of course in a way "connected" to the background. So make sure that the glass ball is in the right place, before you start with the deformations. Make sure that your background is not to plain. A real glass ball doesn't look cool either on white piece of paper in front of a white wall. Always try to use the environment to strengthen the effects you're using to make the result look more realistic.
Note: Several people have commented saying that the background inside the ball should be upside down. These people are wrong, because that's only the case with solid glass balls, this tutorial however is about a hollow glass ball and inside a hollow glass ball the background is not upside down. You can double check that by looked at a glass christmas ball.
This whole tutorial should be seen as a step in the right direction.
The tutorial is divided into 5 main areas:
- Preparing the background and drawing the basic shape (step 1 and 2)
- Filling the shape with gradients and layer styles (step 3 to 6)
- Adding a highlight (step 7)
- Adding a shadow (step 8)
- Adding distortions (step 9)
Some important things you need to know about this tutorial:
- The tutorial is only recommended for people with intermediate and advanced Photoshop experience
- The tutorial was tested many times by us and many other people and we're pretty sure that it doesn't contain any bugs
- It's important that you read very carefully and copy everything what is shown in the screenshots
- Doing this tutorial too fast will most likely result in failure
- This is a hollow glass ball, reason why the background inside the ball is not upside down as with a solid glass ball
1. Prepare the document
Save the following file called Newspaper on your computer (right click on the link and select in Windows Save Target As...). For this tutorial I've chosen to go for a rather small file (640x480 pixels), just to make it easier for you to see what you're doing.
Open the file in Photoshop. Add a new layer by clicking on the Create a new layer icon.
Grab the Elliptical Marquee tool from your toolbar and make a selection (hold down the shift key before you make the selection to make the selection a perfect circle) somewhere in the area and with the size that I'm showing here:

Open the file in Photoshop. Add a new layer by clicking on the Create a new layer icon
Grab the Elliptical Marquee tool
2. Fill the selection with the base color of the glass ball |
Click on the foreground color in the tool bar marked with red in this screenshot: 
In the Color Picker window that opens you enter the value D6D3C0 in the area marked with A:

Grab the Paint Bucket Tool and fill the selection with this color.
Press Ctrl +D (Command + D on the Mac) to get rid of the selection. You can also use the menu to do this: Select/Deselect.
In the Color Picker window that opens you enter the value D6D3C0 in the area marked with A:
Grab the Paint Bucket Tool
Press Ctrl +D (Command + D on the Mac) to get rid of the selection. You can also use the menu to do this: Select/Deselect.
3. Add a layer style |
Go to the layers palette and click on the Add a Layer Style icon and select Inner Shadow and use the settings shown here (watch out: the color white is selected):

The result should look like this:

The result should look like this:
4. Add a gradient |
Add a new layer by clicking on the Create a new layer icon . Clip this layer with the layer underneath by pressing Ctrl + G (Command + G on the Mac) or Ctrl + Alt + G (Command + Option + G on the Mac) if you use Photoshop CS2.
A clipping layer only affects the layer underneath. You'll see soon what I mean.
Change the background color in the tool bar and use the following color: 65645F. We're now going to draw a gradient using the current fore- and background colors. Select the Gradient Tool in the toolbar (if it's not visible, then look under the Paint Bucket tool ).
Take a short look at the next screenshot. Make sure that a linear gradient (B) is selected in the options bar at the top and that the option Reverse (C) is selected. (mode should be normal, opacity 100%, dither and transparency should be both selected, but in most cases they're probably already having the right values)

If you don't see a gradient that uses your colors at A which should look like this , then double click on the gradient in the options bar (A) and select the gradient from the list (most likely the first one) and click OK.
Start in the middle where you see the red dot and end where you see the blue dot (Just before the area where the main color is getting lighter).

The result should look like this:

Press the letter D on your keyboard, which makes the foreground color black, the background color white:
Add a Layer Mask to this layer by clicking on the Add Layer Mask icon . Don't you worry if it switches the fore- and background color when you do this, this is normal behavior. Note: If the fore- and background colors look like this
  after you added the mask, then everything is ok. If they are switched, then just click on the double arrow points icon
  to correct this. The Gradient Tool is still active, but this time we need a Radial Gradient. Select the Radial Gradient
  in the options bar (the one beside the linear gradient (marked B in our previous screenshot of the options bar))
With the layer mask still active (It will have a double border), create a radial gradient by starting in the middle and stopping at the outher edge of our circular shape.
By this time we should you have something like this:

A clipping layer only affects the layer underneath. You'll see soon what I mean.
Change the background color in the tool bar and use the following color: 65645F. We're now going to draw a gradient using the current fore- and background colors. Select the Gradient Tool in the toolbar
Take a short look at the next screenshot. Make sure that a linear gradient
If you don't see a gradient that uses your colors at A which should look like this
Start in the middle where you see the red dot and end where you see the blue dot (Just before the area where the main color is getting lighter).
The result should look like this:
Press the letter D on your keyboard, which makes the foreground color black, the background color white:
Add a Layer Mask to this layer by clicking on the Add Layer Mask icon
With the layer mask still active (It will have a double border), create a radial gradient by starting in the middle and stopping at the outher edge of our circular shape.
By this time we should you have something like this:
5. Add more layer styles |
We're now going to duplicate our Layer 1. Click on its icon in the layers palette, hold down the mouse button and drag (A) the layer to the Create a new layer icon
==================================================================================================
Warning for users of Photoshop CS2 or later : it turns out that Photoshop CS2 changes Layer 2 back to a normal layer, one that is not clipped, when we duplicate Layer 1. To correct that make sure Layer 2 is active and press Ctrl + Alt + G (Command + Option + G on the Mac). Again, this should only be done in Photoshop CS2.
==================================================================================================
Make sure that Layer on (our new top layer) is active (you will notice the
Set the Fill of this layer to 0% (A) and then double click on the Layer Style icon
Use the following effects settings for the layer style. Make sure that all settings are exactly the same, including color or blending mode settings.
Inner Shadow
(pay special attention to the option Use Global Light, because it's not selected! Also notice that we have a black rectangle beside the Blend Mode; double click it if yours is not black, to change its color!)
Inner Glow
After this our image should look something like this:
6. Add more volume |
Add a new layer by clicking on the Create a new layer icon . Select the Brush Tool  in the tool bar.
Click on the area of the options bar that I've marked in red and select a 150px brush, with a hardness of 0%, which is the softest brush you can use.

Set the foreground color to white.
Click once with this brush exactly in the middle of this new layer (Layer 3). Now go to the menu and select Filter/Effects/Gaussian Blur... and select a radius of 25 and click OK.
Note: because we've blurred the white dot, white pixels might appear outside the area that we have defined as our glass ball, so we have to get rid of it. It's quite simple and we're going to use a little 'trick' for that.
With the top layer (Layer 3) still active we Ctrl + click (Command + click on the Mac) on the thumbnail of the layer underneath this layer (Layer 1) which will load it's shape (the ball) as a selection and all we have to do now is to click on the Add Layer Mask iconand we've got rid of all white pixels outside our glass ball.
Now change the opacity of this layer to 30%. This screenshot also shows how your layer palette should look like at this moment:

Click on the area of the options bar that I've marked in red and select a 150px brush, with a hardness of 0%, which is the softest brush you can use.
Set the foreground color to white.
Click once with this brush exactly in the middle of this new layer (Layer 3). Now go to the menu and select Filter/Effects/Gaussian Blur... and select a radius of 25 and click OK.
Note: because we've blurred the white dot, white pixels might appear outside the area that we have defined as our glass ball, so we have to get rid of it. It's quite simple and we're going to use a little 'trick' for that.
With the top layer (Layer 3) still active we Ctrl + click (Command + click on the Mac) on the thumbnail of the layer underneath this layer (Layer 1) which will load it's shape (the ball) as a selection and all we have to do now is to click on the Add Layer Mask icon
Now change the opacity of this layer to 30%. This screenshot also shows how your layer palette should look like at this moment:
7. Create a highlight |
Add a new layer in Photoshop by clicking on the Create a new layer icon and that's going to be Layer 4. Select the Brush Tool and use a hard brush (hardness is 100%) with a size of 20. Change the foreground color to white (or a very slight yellow (close to indoor light) using a value of FFFFE8).
Place the highlight in the location shown here:

Go to the menu and select Effects/Blur/Gaussian Blur... and select a small radius of .5 and click OK.
Go to the layers palette and click on the Add a Layer Style iconto add a layer style and select the Outer Glow effect and use the settings shown here:
Place the highlight in the location shown here:
Go to the menu and select Effects/Blur/Gaussian Blur... and select a small radius of .5 and click OK.
Go to the layers palette and click on the Add a Layer Style icon
8. Add a shadow |
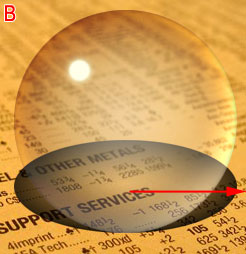
First make the Layer 1 copy (the one above the background layer) the active layer by clicking on it; a will appear in front of it. Now set the Fill of this layer to 25% 
You'll notice that by doing that, that we're are getting closer to the final result:

If the bottom is too bright (marked with the arrow), then just select the Layer Style of Layer 1 copy and lower the opacity of the Inner Shadow effect (or increase it if that's what you prefer).
We now click on the background layer with the newspaper image on it, to make it active.
Add a new layer by clicking on the Create a new layer icon.
With this layer (Layer 5) active we click on Ctrl + click (Command + click) on the thumbnail of the layer above (the one with glass ball, Layer 1 copy). The result is a selection in layer 5 that is based on this glass ball.
Press the letter D on your keyboard, which makes the foreground color black, the background color white
We're now going to draw a gradient using the current foreground color (black) in combination with transparency. Select the Gradient Tool in the toolbar (if in it's not visible, then look under the Paint Bucket tool ). Make sure that a Radial Gradient (B) is selected in the options bar at the top and that the option Reverse (C) is selected.

If you don't see a gradient in your options bar ( A), that looks like one going from transparency to black, then double click on the gradient in the options bar (A) and select the gradient from the list (the one right beside D) and click OK. Draw the gradient by starting in the middle of your selection and end at the edge of this same selection.
We're now going to transform this selection in an elliptical shape by using the transform tool. Go in the menu to Edit/Free transform or press Ctrl + T (Command + T on the Mac). A rectangular box with 8 handles will appear.
Now pull the upper center handle downward (see A) until you have a shape that looks like the one in B.
Now press enter on your keyboard to complete the transformation and press Ctrl +D (Command + D on the Mac) to get rid of the selection. You can also use the menu to remove the selection: Select/Deselect.


We now have to move this shadow to the right (B). Be aware that the arrow only marks the direction, not the distance.
Select the Move Tool in your tool bar.
To move the selection, click on the shape and while holding the mouse button move the shape in place. Have a look at screenshot C to see where you should place this shadow. If your shadow seems to jump while you try to move it, then go to the menu and select view and make sure that Snap is turned off:

Now change the opacity of this layer to 50%. In the menu we select Filter/Blur/Gaussian Blur... and select a radius of 2 and click OK. On the right you can see how the layers palette should look like after you've done all steps (in this screenshot I marked the color of the shadow layer with yellow).

You'll notice that by doing that, that we're are getting closer to the final result:
If the bottom is too bright (marked with the arrow), then just select the Layer Style of Layer 1 copy and lower the opacity of the Inner Shadow effect (or increase it if that's what you prefer).
We now click on the background layer with the newspaper image on it, to make it active.
Add a new layer by clicking on the Create a new layer icon
With this layer (Layer 5) active we click on Ctrl + click (Command + click) on the thumbnail of the layer above (the one with glass ball, Layer 1 copy). The result is a selection in layer 5 that is based on this glass ball.
Press the letter D on your keyboard, which makes the foreground color black, the background color white
We're now going to draw a gradient using the current foreground color (black) in combination with transparency. Select the Gradient Tool in the toolbar
If you don't see a gradient in your options bar ( A), that looks like one going from transparency to black, then double click on the gradient in the options bar (A) and select the gradient from the list (the one right beside D) and click OK. Draw the gradient by starting in the middle of your selection and end at the edge of this same selection.
We're now going to transform this selection in an elliptical shape by using the transform tool. Go in the menu to Edit/Free transform or press Ctrl + T (Command + T on the Mac). A rectangular box with 8 handles will appear.
Now pull the upper center handle downward (see A) until you have a shape that looks like the one in B.
Now press enter on your keyboard to complete the transformation and press Ctrl +D (Command + D on the Mac) to get rid of the selection. You can also use the menu to remove the selection: Select/Deselect.
We now have to move this shadow to the right (B). Be aware that the arrow only marks the direction, not the distance.
Select the Move Tool
To move the selection, click on the shape and while holding the mouse button move the shape in place. Have a look at screenshot C to see where you should place this shadow. If your shadow seems to jump while you try to move it, then go to the menu and select view and make sure that Snap is turned off:
Now change the opacity of this layer to 50%. In the menu we select Filter/Blur/Gaussian Blur... and select a radius of 2 and click OK. On the right you can see how the layers palette should look like after you've done all steps (in this screenshot I marked the color of the shadow layer with yellow).
9. Deform inside of glass ball and shadow |
In this last step we're going to deform the image inside the glass ball. Make sure that our shadow layer (Layer 5) is still active and Ctrl + click (Command + click) on the thumbnail of the layer above (the one with glass ball, Layer 1 copy). The result is a selection in layer 5 that is based on this glass ball (like we did in step 8). Now got to the menu and select Filter/Distort/Spherize...
Select for Amount the value 100% and make sure that Normal is selected for Mode. Click OK.
The shadow is now deformed.


Select for Amount the value 100% and make sure that Normal is selected for Mode. Click OK.
The shadow is now deformed.
Make the background layer active and press Ctrl + F (Command + F on the Mac).
Note: Ctrl + F will always apply the filter that was used previously, in our case Spherize.
Note: Ctrl + F will always apply the filter that was used previously, in our case Spherize.
That was our final step and this is the result:
Tutorial Update - Improving the highlight |
In this update we're going to improve the highlight. Click on Layer 4 that contains our highlight to make it active.
We are now going to transform the highlight by pressing Ctrl + T (command + T on the Mac) and entering a value of 65% for Horizontal Scale (A) and a value of 45 for Rotation (B) and press enter twice:
This makes the highlight look more like an actual part of the ball:

We are now going to transform the highlight by pressing Ctrl + T (command + T on the Mac) and entering a value of 65% for Horizontal Scale (A) and a value of 45 for Rotation (B) and press enter twice:
This makes the highlight look more like an actual part of the ball:
Final words |
Also be aware that once you deform the shadow or inside of the ball that you're not able to move the ball, since both deformations are of course in a way "connected" to the background. So make sure that the glass ball is in the right place, before you start with the deformations. Make sure that your background is not to plain. A real glass ball doesn't look cool either on white piece of paper in front of a white wall. Always try to use the environment to strengthen the effects you're using to make the result look more realistic.
Note: Several people have commented saying that the background inside the ball should be upside down. These people are wrong, because that's only the case with solid glass balls, this tutorial however is about a hollow glass ball and inside a hollow glass ball the background is not upside down. You can double check that by looked at a glass christmas ball.
This whole tutorial should be seen as a step in the right direction.
No comments:
Post a Comment