Thursday 31 May 2012

4 Different Effects You Can Add to Your Logos and How to Do it Well

Tones
Using tones is one of the easier ways to make your logo attractive while keeping a simple modern look. All you have to do is decide on a color scheme based on what your logo stands for and choose 2 or more variation on a single color. In the example below, we have the fictional company AirThread. I chose blue as the main color and used a dark and light variant to create an understated look.
Using tones is made even easier by the swatch libraries available in Adobe Illustrator. You can pick a collection of colors that go well together and just click around until it looks right. For this example I used the “Cool” color palette.

Tones

Gradients
You can use gradients in a number of ways on your logo design depending on whether you’re using Illustrator or Photoshop. When using Illustrator, the gradient mesh tool is the best way to go. That simple tool gives you a lot of options for getting your logo the way you want it. Let’s take a closer look:
First you lay out your text and images:

Gradients
 
Then you choose the gradient mesh tool:

Mesh Tool

That will create an arrow that will allow out to add points to the object you click, creating a mesh around the shape that looks like this:

Shape Tool
 
You can click as many times as you want to add as many different colors as you want but to make something look round you really only need 2 to 4. Decide whether you want to cast your light from the left or the right then place your highlights and shadows accordingly to give your object dept. Using lighter or darker shades of your main color will make your end product more realistic than using just grey and white. In our finished product, you can see that the eggs are a little shiny because we added one area of dark and one area of light to each.

The Bunny Ranch

While making logos is easier in Illustrator, mostly because they are vectors that can be sized at will, gradient treated logos are better in Photoshop. Again we’ll start with our text:
Startiing Picture
And instead of using the standard gradient tool in Photoshop, we’re going to use the “FX” button on your layers tab (note if you have a version of Photoshop earlier than CS2 you won’t have this button). That button will bring up this screen:
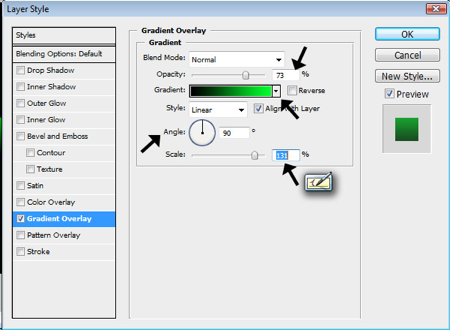

Gradient Effects
You choose how much transparency you want in the “Opacity” field, what colors you want from the “Gradient” drop down, which direction you want the gradient to slant in the “Angle” box and how big or how small you want the gradient to appear on your objects or letters from the “Scale” bar. Selecting the above options and adding a black background gave me this:

Ghosteck
 
Not super high tech but it accomplishes the feel I was going for. The reason Photoshop is better in this arena is that handy little window. You can edit and change and tweak without really altering your image, the whole thing is an overlay so if you wanted to retype your wording or change you logo from a oval to a triangle, you wouldn’t have to start again from scratch.

Shadows
Shadows can be more than just drop shadows, they can also serve as reflections. For the next example, we’ll start with our Ghosteck logo and add a little bit of a shadow to show how something small can take a good logo to better.

The first thing you need to do is make a copy of your layer then turn it upside down and flip it so it’s a mirror image. Then you fade it. Basically I reversed all the settings I had in that handy window then tweaked it till I thought it looked right.
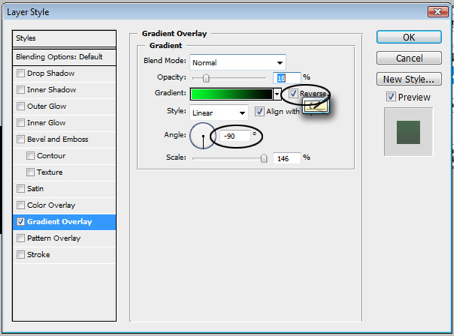
Shadow Effects

And that gave me this…

Ghosteck Mirror Effect

Glow
Glow can do a lot of things and is considered a lighting effect. Basically what it does is create an edge around your object or text that softly disperses color. You can control the color, how far from your object it goes out and whether or not the cloud is smooth or looks like static. For this example I went with a smooth glow for a semi haunting look.

Glow Effects

Accomplishing this look was easy, again the handy “FX” window helped me choose the right glow settings to make Ghosteck a little less plain. I just moved the sliders bask and forth until I found a medium I could be happy with.
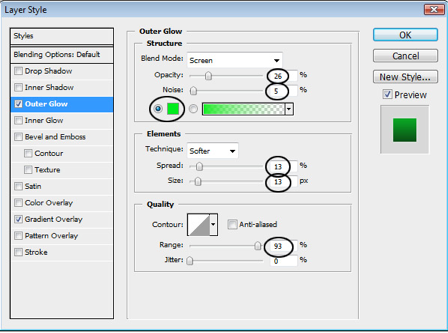
Layer Styles

There is one caution though; too many effects will have people staring at your logo for the wrong reason. Subtlety and moderation are the key in making a dressed up logo look effortlessly powerful.
Paul Adrian Gonzalez writes for Impact Logos, Australia’s premiere logo design company. Visit Paul’s little nook to learn more how to create a high-impact business logo for your startup company.


Wednesday 30 May 2012

How to Make Animated Signature Using Adobe Photoshop, Imageready


Creating an animated is one of the unique way to grab attention of the reader. Signatures play a vital role in email and other social network in modern days. See to that you make a unique and pleasant signature. Please avoid using irritating colors it will surely spoil your readers mood. In this tutorial I will explain in detail how to create Animated signature using Adobe photoshop and Imageready software.
1. The signature consist of an animated object.
2. Its moving ,yeah thats what it makes look like animated.
3. Observe more carefully the signature consist of frames.
4. After each frame the body moves.
5. Note the speed its uniform.
6. Frames are interlaced and transparent that what cause moments if its stuck the sig wont look nice.

What you Need?
  • Photoshop CS3 (recommended by me)
  • Adobe Imageready
Steps for Creating signature in Photoshop
1. Open Photoshop and create a new image file measuring 100 by 100 pixels. Set the resolution to 72 pixels per inch and the mode to RGB color.
2. Choose Show Layers from the Window menu. This will bring up the Layers floating palette.
3. Select the pencil tool. Use it to draw a picture.
4. Click on the Layer palette’s submenu arrow and select Duplicate Layer.
5. Click on the eyeball icon to the left of the bottom layer on the Layer palette. Use the pencil tool to add to the image on the top layer. Select the erase tool to remove part of the image.
6. Under the file menu, select Jump to, and then Adobe ImageReady . Save when prompted.

Steps for Creating signature in image ready
1. Choose Show Animation from the Window menu. This will bring up the Animation floating palette.
2. Click on the Animation palette’s submenu arrow and select Make Frames from Layers.
3. Use Save Optimized As to save the animation under a new name.

Imageready Tips and Warnings
1. You can draw directly in ImageReady, which has nearly identical tools.
2. Preview your animation by pressing play on the Animation palette.
3. Add more unique frames for a richer animation.
4. Click on the time values at the bottom of each frame to adjust how long it will remain visible.

Note
For orkut signs make sure you keep the background as transparent. If u think that u are more advanced in doing all those add special effects like shadow blur,apply filters etc..
Remember each frame has its own importance make sure the require time is constant

once a gif image is created.
Upload it On photoshop or using picasa or imageshack or on orkut using add photo.Save the image location for embedding it inside use
< img src = your image >

I hope you understood by that and i tried my level best to explain all this things to u with out omitting any steps. 


Tuesday 29 May 2012

How To Enable Gmail Preview Pane

Gmail has got new layout, there is now a preview pane option in Labs. With this cool new feature included in Gmail users can now get  two-pane view which displays the email list as well as the currently selected message in either horizontal(New Yahoo mail like) or vertical split(iPad-like) view.

Steps to Enable Gmail Preview Pane
1. Sign-in into your Gmail account.
2. Goto Gmail Setting –> Click Labs section.
3. Search for Preview Pane.

Gmail Labs Preview Pane

4. Click on Enable radio button and hit Save Changes.
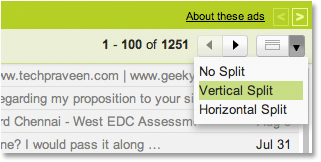
5. Once you’ve enabled it, there will be a new button on top of the email list which will enable you to activate the vertical split or horizontal split and switch between the full list view and the split view.

Gmail Preview Pane Verticle View

6. That’s it :) .The currently selected message will be displayed in full to the right or below the email list.

Gmail Verticle Preview Pane

And by default, messages previewed in the pane are marked as read after three seconds. 


Start with the Basics: How to Design an Attractive Website

These web design tips can be used by newbies and advanced web designers alike. Sometimes it pays to go back to the basics and build a website based off of principles that really work to attract visitors to visit again and again.
    Design An Attractive Website
  1. Use a cohesive color scheme. If your business has specific colors or a set company logo, this is a good place to begin. If you are starting from scratch, choose several colors and stick with them throughout the design of your website. If you’re not sure what color scheme to choose, check out a few of your favorite websites and see what looks best. You can use these websites to model your website color scheme off of.
  2. Start with a template. If you are new to web design, a template is a great place to begin. Many templates come with web design software or can be downloaded for free. Additionally, templates are often customized to specific niche markets, like health and beauty, business, or blogging.
  3. Make your website user-friendly. Many web designers make the critical mistake of designing their website only for SEO. But that is only one side of the coin! It is equally as important to design your website for visitors, as well as search engine spiders. Yes, it is important that your website is optimized so that it can be indexed in the search engines. But if visitors can’t find your website or can’t navigate through all of the pages, then your traffic will leave, and your sales will decrease.
  4. Remember that less is more. As you get more experienced in web design, it can be tempting to go out with guns blazing. But many times, less is more. Have you ever noticed that the Google homepage is completely blank, yet it is the one website that controls the entire Internet? In the same way, put careful thought into the special effects that you use for your website, like flash and spinning graphics. These special effects can be distracting and may cause a page to load slowly.
  5. Consider the color of your background. It is most important that any website visitors can clearly read the text on your website in contrast to the background. This means to avoid yellow font on a white background or gray font against a black background. A black font against a white or lightly tinted background is your best bet to ensure that all content is attractive and easy to read.


Monday 28 May 2012

Increase Your iPhone Battery Life With These Easy To Use Tips


Increase Your Iphone Battery Life With These Easy to Use TipsIf you are an iPhone users then you must be aware of the less point of Apple’s iPhone is its Battery. With every usage of it the %age of battery decreases. Iphone offers its users whole new world of features, apps, games which cannot be resisted from exploring. But the main concern for the user will be saving the battery throughout the day. Maximum iPhone battery is 100% and it rapidly decreases according to the usage.

But every problem has a fix to it and Apple has done that for the battery issue. So let’s explore these few simple and few little tricky ones to get that extra bit of battery.

When Not in Use Turn off Your iPhone All Wireless Applications

All the latest phones, being specific Smartphone come with inbuilt wireless applications like Bluetooth and wifi access. So it is advised to switch off such features when they are not in use. As these features tends to deplete your iPhone battery fast. So turning them off can help you extend the battery life for several hours.

If not required then disable the 3G as well. As the 3G technology survives on the battery of the phone. If possible to turn off it will give you long battery life for whole day.

Make use of the auto brightness feature of your iPhone. This will automatically adjust the back light of IPhone as required. This adjustment also helps in saving battery.

Manually Lesser The Screen Brightness

Although you have enabled the auto brightness feature but in some scenarios it does not dim the light as required. There you can manually lower the brightness of the home screen for saving of the battery. Preferred is to keep your brightness to 49% to make optimum use of the iPhone battery.

End Background Apps

According to Apple, the background apps are not technically ‘running’, unless they are front and centre, which means they should not draw any power.

The multitasking application for the iPhone continues to use resources of system more efficiently depletes your battery.

Applications, for example, Skype or even other VoIP can be especially benefit from the battery when you perform within the setting and so it is better to start launching the applications only when you need which can save the battery life.

Cool Off The IPhone Temperature

High temperature of iPhone also eats up its battery life. If you find that while charging your phone the temperature is increasing, then remove the phone cover before plugging in for charging. Let it also have a breath of fresh air so place it on a table or in open space instead of your pocket. The optimum temperature for iPhone and its battery is between 32°F to 95° F.

Make Use of Solar Chargers

Solar chargers give you freedom of charging your iPhone from anywhere. So if your battery is dying out, you can save it with solar power.

Also another advantage is that you can follow the motto “Go green” while saving the electricity which in turn protects the environment.

Frequently Use your iPhone:
We all know that iphone is a precious thing for anyone but that does not mean that you restrict its use to protect it from daily wear and tear. It is best valued with optimum use of it. Not using the iPhone for a long time can reduce its battery life. Therefore one should use it regularly and change iPhone battery at least once every 6 months.

Apple has also strongly recommends that you should charge your iPhone when the battery is completely finished i.e. 0%.

So follow these tips and you can easily save your iPhone battery life and enjoy it for long.


Sunday 27 May 2012

How to undelete files on Windows with Undela

Undela is Ctrl+Z files you've emptied out of the recycle bin.

Chances are that you've deleted a file by accident. Sometimes you're lucky enough to still have it lingering around in your recycle bin, other times you panic after realizing you emptied it three days ago.
Note: This recovery utility can only restore files that are in empty space on your hard drive or removable storage. This means you cannot have overwritten the space previously occupied by the deleted file with new things. This may be the case if you use a utility like CCleaner to overwrite empty space several times when using the cleaning function. If you're unsure about the status of the drive space, give Undela a try anyway.

Step 1: Download a copy of Undela for your Windows computer or laptop. The install process is super quick so you can get started right away.

Step 2: Open the app when the Installer is finished running and choose the drive you'd like to recover files on in the far left-hand pane.

 
Step 3: Click the Scan button at the top of the app to see a list of files that can be recovered on the far right. 

Tip: If you only want to look for certain file types -- say PNG -- you can adjust this setting in Options area. Just go to File > Options and check off the file types you're seeking.

Step 4: Once you've found the file(s) you're looking for, mark the check box(es) to the left of the filename(s) and then click the Restore button. 


Also worth mentioning is the file preview that Undela displays when doing its recovery magic. This is handy if you're not sure what the exact file name was of that picture you deleted on accident and don't want to recover everything just to find it. Just select the file name in the list and then press the Preview button (on the right-hand side of the toolbar) to take a look at it. 


Step 5: Choose the place on your disk space you'd like to place the recovered file(s). 

While serving as a handy tool to fix deletion mistakes, Undela can also help show you just how much information you thought was gone is still hanging around on your computer.


Saturday 26 May 2012

AVG defends mobile app after removal by Microsoft

AVG is sticking by its new antivirus software for Windows Phone despite a flurry of complaints and a decision by Microsoft to remove the app from the Marketplace.

Launched a week ago, the app by AVG was designed to detect and remove viruses on Windows Phone devices. But after a couple of external experts noted that there are presently no viruses on Windows Phone and that the software seemed to violate guidelines by capturing certain private data, Microsoft pulled the app from its online store late last week.


Responding to Microsoft's move, AVG's Chief Technology Officer Yuval Ben-Itzhak issued a statement on Friday in an attempt to address the two major complaints against the app, known as AVG Mobilation.

The first complaint centered on the app improperly using a geolocation feature to track Windows Phone devices and send certain data back to AVG. Ben-Itzhak acknowledged that the app does include such a feature but claimed that its only purpose is to help a user locate a phone should it ever be lost or stolen.
"This feature was a response to requests by many mobile users and is a functionality that exists in many other mobile products," Ben-Itzhak said. "To do this effectively, AVG Mobilation is enabled to uniquely identify a device and read its geolocation by utilizing the built-in GPS system."

Further, the user has the option of keeping geotracking enabled or opting out of it and of deciding whether or not to input an e-mail address, presumably to be informed of the phone's location.
he second complaint focused on the need for a Windows Phone antivirus app in the first place if no viruses yet exist on the platform. Here, Ben-Itzhak admitted that any viruses and malware aimed at Windows Phone 7 are relatively few at this point. But he added that the app is about more than just scanning for viruses.
"Protecting valuable personal information on mobile devices is not just about scanning for viruses and other malware," he said. "It is also about protecting against outside threats that are using the Internet as an attack vector, threats such as phishing attacks for instance."

Ben-Itzhak also compared Windows Phone 7 to Android, pointing out that three years ago, Android faced few viruses and malware. But as Google's mobile OS has grown in popularity, so have the threats against it.

In a blog published early last Friday before the app's outster from the MarketPlace, AVG said that it had actually worked with Microsoft to develop the software.

"Our teams were trained by Microsoft and our software was provided to the company for review and certification prior to release," AVG noted in the blog. "We did implement a number of requested changes provided to us by Microsoft."

Despite Ben-Itzhak's defense of AVG Mobilation, the app seems to have violated certain guidelines, at least according to Microsoft. The Windows Phone maker confirmed with CNET last Friday that it's currently working with AVG to make sure the app follows Windows Phone guidelines.

"AVG's app has been removed from Windows Phone Marketplace while we work with AVG to ensure that the app is in full compliance with our published policies," Microsoft said in a statement.

"While we never like to see our products pulled from app stores, we understand that Microsoft is simply following its established process for reviewing products once questions have been raised by individuals in the marketplace," Ben-Itzhak added. "We look forward to the product's quick return to the digital shelves of the Windows Phone 7 app store."

Know More :http://www.avgmobilation.com/

Free Download Now 


Friday 25 May 2012

How to rebuild a user account in OS X


Problems with user accounts in OS X can happen that result in an account not being able to change configuration options and previously accessible resources. One example of such behavior is an admin account no longer being able to authenticate to access system preference settings even though it is listed as an admin account. Another indicative behavior would be the inability to modify that account's settings, such as its password, log-in window picture, or custom home folder location.

While people might think to look for the root of these problems within the user's folder, they will not find them there. The reason for this is the directory structure that defines the account and its capabilities is stored within the hidden /var/db/dslocal/ directory, unlike other system and user settings that are within preferences folders either in the global or user library folders. Should a setting within these configuration files become corrupted, then the account's stability and capabilities might be compromised.
To address such problems, while some people might try adjusting these account properties manually to preserve the account's integrity and correct the issue, such manipulations can be dangerous if done incorrectly. Incorrect settings to these account files can corrupt the problematic account even further and prevent it from logging in, or even corrupt additional accounts and lead to system instability.

If your account is not working properly and others on the system are functioning just fine, then one simple approach to fixing the issue is to simply wipe and rebuild the directory structure for the account. While this may sound like a daunting task, in OS X it is actually quite easy to do and will not require much use of the Terminal (if any) and not harm any of your user data or settings.
In order to do this, you will need to have at least one working admin account on the system, so if your corrupted account is the only admin account then you will need to first create another admin account. Unfortunately creating a new admin account from within OS X generally requires you have an existing working admin account, but you can overcome this requirement by forcing the OS X setup assistant to run when the system next boots. To do this, follow these steps:
  1. Reboot into Single-User mode by holding the Command and "S" keys simultaneously at startup.
  2. Mount the filesystem as read/write by running the following command:
    mount -uw /
  3. Run the following command to delete the OS X setup "complete" flag:
    rm /var/db/.AppleSetupDone

User home folder deletion options

Be sure to preserve the account's home folder by selecting this option when deleting the user account. 

When this is done, enter "reboot" at the command prompt and the system should restart and launch the OS X setup assistant tool, which you can then use to create a new user account (make sure it is a different name than the account you are trying to restore).
Once you have a new admin account on the system, log into it and then go to the Users & Groups (or "Accounts") system preferences, and locate the problematic account. Then click the lock to authorize changes, followed by selecting the account and clicking the minus button to delete it. This action will prompt you to either save the home folder in a disk image, delete the home folder, or don't change it and leave it in its current location.
In this case, you will want to leave the folder as-is, so click the option to not change the home folder, and then continue and click the "Delete User" button.

Existing home folder warning

When recreating the user account, choose the option to use the existing home folder when prompted.
By performing these actions, you have deleted the user from the system's directory but have kept the user's settings and data intact by preserving its home folder. Now go to the /Macintosh HD/Users/ directory and locate the home folder for the deleted user. If its name includes "(Deleted)" in it, then edit the name and remove these components so it is the same as the short username of the account (renaming the folder will require you authenticate with your new user account).

Once the home folder is renamed, then go back to the Users & Groups system preferences and recreate the account, ensuring you use the same names for both the full and short account names. If done properly, the system will detect the existing home folder that is the same name as the new user account, and will display a warning with the option to use this home folder for the new account. Click "Use Existing Folder" and then the account will be restored.

After the account is set up, try logging out and back into it to test its functionality and ensure it works as expected.


Thursday 24 May 2012

Three ways to take a screenshot on a Mac

         As a tech blogger, I take a lot of screenshots on my MacBook Pro. I use the Command-Shift-4 method frequently to take a screenshot of a selection of my desktop, but there is a better way if you want to take a screenshot of an open window. 

 Ironically, a screenshot does not accompany this blog post.

I'm getting ahead of myself. Let's review the three keyboard shortcuts for taking screenshots on a Mac:

Command-Shift-3
It captures a screenshot of your entire screen.


2. Command-Shift-4
It turns the cursor into a crosshair, which you can drag to select a portion of your screen to capture. Release the mouse button or trackpad to take the shot.


3. Command-Shift-4, then space bar, then click on a window
Hitting the space bar turns the crosshair into a little camera icon, which you can move over any open window. Click on your desired window to take a screenshot of it. A screenshot captured by this method features a white border around the window with a bit of a drop shadow.


Wednesday 23 May 2012

Google: Your bridge from Outlook to any smartphone's calendar

I love Outlook. Don't judge; I'm not alone. It's an outstanding tool for handling e-mail and my calendar. But what if you want to view your Outlook calendar when away from your desktop? I've found Google Calendar Sync is an awesome solution.

I know there's Microsoft Exchange that many companies use for syncing Outlook to other devices. I've never been in an organization that used it. Instead, my life of syncing Outlook to a phone started years ago when I'd use Microsoft ActiveSync to have Outlook talk to my Windows Mobile phone.

Oh, those were the days. Then along came the iPhone, and iTunes took over, allowing me to sync my Outlook calendar to my iPhone. But, I had to remember to plug-in my phone to do this. Meanwhile, what about syncing to the Web? And syncing to Android? And these days, syncing to Windows Phone?

Google Calendar Sync is the solution to all of these issues, at least if you use Windows. I dearly wish Google would support the Mac with this, and I'll revisit that wish at the end.
Google Calendar Sync is a lightweight program you install that automatically syncs whatever is on your Outlook calendar to your  Google Calendar account (you'll need to create a Google Calendar account, if you don't already have one). You can sync one-way, to send only stuff on your Outlook calendar to Google or vice-versa. Sync two-way if you want calendar entries made in either place to flow back-and-forth.

Outlook to iPhone
Once Outlook is talking to Google Calendar, life is beautiful for the smartphone user. Let's start with the iPhone (and this works for the iPad, as well). Go to "Settings," then "Mail, Contacts, Calendar," then choose "Add Account." You'll see Gmail as one of the options listed.


Select Gmail, providing your Google information as required. After the account is set up, you'll see it listed within "Mail, Contacts, Calendars." Select it, then be sure you've toggled the "Calendars" link to "On." Once that's done, voila! Now you've channeled your Outlook calendar through the cloud to Google and back down to your iPhone.

Outlook to Android
With Android, it's a similar process. From the "Settings" menu (which most Android phones should have), look for something like "Accounts & Sync." Click "Add an account," then select "Google" and enter your details. 


When done, go back to "Accounts & Sync" and select the Google account that's associated with your Google Calendar. Click on it, then make sure you've ticked the "Sync Calendar" option. That's it. Now Outlook is talking to Android, via Google.

Of course, with Android, you'll almost certainly already have a Google account listed in "Accounts & Sync." You need one to use most Android devices. If so, just make sure that you've created a Google Calendar account that's linked to that account, and you're set. This also works for Android tablets, too.

Outlook to Windows Phone
With Windows Phone, it's the same familiar process. Go to "Settings." Select "Email+Accounts." Select "Add An Account," and then choose "Google." Enter your Google account details. After it has been added, go back to "Email+Accounts" and select the Google account. Then be sure you've ticked the "Calendar" box.

Outlook to the Web
That covers getting your Outlook calendar from your desktop to your devices. A byproduct of this is that you also have a Web-based version of your calendar. Just log into Google Calendar, and all your details are there.


If you're using Google Calendar Sync set to two-way, you can even make changes to your web-based calendar and have them flow back to your desktop.

Outlook to the Mac's iCal
The fun's not over. My desktop computer runs Outlook 2010 for Windows 7, but on the road, I travel with a MacBook Air. Can I flow my Outlook calendar to that? You bet!


Open "System Preferences," then "Mail, Contacts & Calendars." Add your Google account. When that's done, be sure to have selected the "Calendars" tick box for your account. Now your Outlook calendar will flow through Google into iCal.

Left out, Outlook for the Mac
Unfortunately, I don't like iCal. I prefer -- surprise -- Outlook 2011 for the Mac. Sadly, Google doesn't make Google Calendar Sync for the Mac. That really sucks. I'll be following up with Google about whether we'll ever see this happen.

As for Microsoft, nothing seems to have changed from late 2010, when Microsoft warned that for anyone looking to sync with Web-based calendars, "Outlook for Mac may not be ideal." The support page on syncing Outlook For Mac still offers no help. The "Sync Services" option in Outlook For Mac, despite saying it can sync Outlook data with iCal, doesn't seem to do with the calendar.
As with Google, I'll be following up with Microsoft about this. In the meantime, my solution is to run Windows 7 using VMware Fusion on my MacBook Air, then run Outlook For Windows within that. Then if I'm on a long trip, and I really need to interact with my Outlook calendar a lot, I've got a solution.
Got a better solution or great calendar sync tip? Please share below!


Tuesday 22 May 2012

Spring cleaning tips to revive your Windows PC


It's always exciting when you bring home a new computer. It feels so powerful and fast; you can't imagine ever needing to buy another one again. Unfortunately, neither your excitement nor your PC's performance lasts.

Whether your hard drive is running out of space or your system takes forever to run simple tasks, it might be worth your time to try and revive it before replacing it. Here are some spring cleaning tips to revive your Windows PC:

Free up disk space
The enormous size of modern multimedia files can eat up your hard-drive storage quickly. What once seemed like a laughable amount of storage, can suddenly become insufficient. But are you using that storage efficiently?


  • Uninstall software. It's easy to forget about software you've installed but haven't used in a while. Get rid of trial software, games you don't play anymore, and other software you rarely use.
  • Run the Windows Disk Cleanup tool and while you're there, go to the More Options tab to also clean up your system restore files.
  • Empty your Web browser cache. Over time, you'd be surprised how much space a browser's cache takes up.
  • Use CCleaner to automate your cleanup tasks. It's one of the best Windows utilities around.
  • If your hard disk is still short on storage, try running WinDirStat to see what's taking up all that storage. You might discover forgotten files you no longer need.
  • To free up even more disk space, consider using Duplicate File Finder to identify and remove duplicate files on your system.
Recover performance with software tools
Performance on Windows computers tends to degrade over time, but with a few OS tweaks, you can recover some performance.

  • Defrag your hard drive. Especially after performing massive file deletion tasks, your hard disk is going to be heavily fragmented. Use the default Windows defrag utility or a third-party program like, Defraggler to speed up disk access.
  • Make Windows start faster. You can use the Windows msconfig utility to prevent programs from starting up automatically, or use CCleaner. You can also bypass the Windows logo by setting the No GUI boot setting. For a more in-depth look at improving Windows startup, read Dennis O'Reilly's post.
  • Check for updated hardware drivers for components like graphics cards, printers, and network adapters. Updated drivers often fix bugs and improve performance.
Increase performance with simple hardware upgrades
Simple hardware upgrades can make your system perform better than when it was new.

  • Adding RAM is still one of the most cost-effective ways to improve PC performance. Check your system specs to confirm the maximum amount of RAM that can be installed. Also, remember that only 64-bit versions of Windows can see above 4GB.
  • If you're still using a mechanical hard drive in your computer, migrating to an SSD drive will significantly improve system performance.
  • Can't justify the cost of an SSD? Consider upgrading to a hybrid drive. A hybrid drive uses a small amount of solid-state storage along with a traditional mechanical drive to boost performance, for much less than the price of an SSD drive.
  • If you're not up for migrating your Windows 7 system to a brand-new drive, SSD cache drives are an easy way to boost performance. They're small, inexpensive SSD drives that can be added to your system without having to migrate Windows or your data.
Check your Windows system security
While you're tuning up your system for performance, it's also a good time to check your system security.

  • Make sure Windows Update is enabled and scheduled for automatic updates. Updates often contain security patches, so this is essential for keeping your Windows PC secure.
  • Make sure you have a highly rated firewall and antivirus program installed with automatic updates turned on. Free security programs are OK in a pinch, but they're usually crippled in some way or don't measure up to the premium ones. Internet providers like Comcast and AT&T also provide premium security programs for free with service. And online retailers routinely offer huge discounts after rebates on security software.
  • Consider adding a physical firewall to your network. An oft-forgotten benefit of Wi-Fi routers is the fact that they serve as a firewall between the Internet and your home network.
  • Review your system backup plan. Don't have one? Get one. And here's the most important part about a backup plan: test the restore to make sure it actually works.
Clean your hardware the right way
Cleaning your computer gear not only makes them look nice, but also keeps germs at bay and can help your system run better.

  • Clean and disinfect your keyboard and mouse. Computer keyboards can get pretty filthy from just normal use, not to mention from eating at our desks or working while we're sick. Studies have shown that keyboards have more bacteria than toilet seats -- ick!
  • Clean your computer LCD display. Remember when your computer LCD display had that brand-new, fresh out-of-the-box shine? If it's looking a little dull lately, it might be time to give it a good cleaning.
  • Clean the inside of your computer. Over time, dust buildup inside your computer could undermine its cooling efficiency, resulting in shorter life spans for your computer's components.
What to do with your old PC
If you've decided to go ahead and buy a new PC, you can still use your old one for some great things or sell it to put some cash back in your wallet.

  • Turn your old PC into a media center PC, networked media storage, Linux test PC, home security monitor, or a backup storage device. Rob Lightner shows you how.
  • Strip it for parts. One of the most reusable parts of an old PC is the hard drive. Pull the internal hard drive out and make your own an external hard drive out of it.
  • If you're going to sell your old PC, we have some helpful tips on how to sell it.
That's it. Performing some or all of these tips should help keep your Windows PC running smoothly for at least another year. If you have questions on any of these tips, let us know in the comments below.


Monday 21 May 2012

Quickly remove USB devices without using Safe Removal

USB drives        USB devices can be hot-swapped, but their convenience is hindered by their need to be removed safely by using the Windows Safe Removal option. There's a policy for each USB device, however, that allows you to set them for quick removal, at the expense of a very minor performance hit.

Here's how to check to make sure that your USB device's quick removal policy is turned on:

Step 1: After you've inserted your USB device, launch Device Manager by hitting the Windows logo key, then typing "device manager" and selecting it from the search list.

Step 2: Drill down in Disk drives and double-click on your USB device.

Device manager 

Step 3: Go to the Policies tab and make sure that "Quick removal (default)" is selected.

Quick removal policy 

That's it. Keep in mind that this policy setting doesn't mean you should remove your USB device in the middle of a file operation. It just means that once the copy, delete, or move operation has been completed and the activity light on your device is no longer blinking, you can remove the device without using the Safely Remove Hardware notification icon.


Sunday 20 May 2012

Lock and unlock your computer with a USB drive, secret-agent style

If you prevent access to your computer with just a password, you are missing out on an alternate (and more secure) way to lock down your computer.

Predator, a free Windows program, turns your USB drive into a key that locks your computer when it's removed. To unlock your computer, you'll have to plug the USB drive back in. (Talk about having secret-agent-style security.)

Anyone who attempts to access your computer without the USB flash drive will be hit with an epic "Access Denied" message. To get started, follow this guide:

Step 1: Download and install Predator

Step 2: Once Predator launches, plug in your USB flash drive. None of the contents of the drive will be deleted or altered in any way, so feel free to use your primary thumbdrive.
When you insert the drive, a dialog box will appear asking you to create a password. Click OK to continue. 

Step 3: In the Preferences window, take note of a few key settings. First, enter a secure, unique password in the "New password" field. If you lose your USB drive, you'll use it to unlock your computer.
If you'd like, you can check the Always Required box and you'll be asked to enter the password each time you use your thumbdrive to unlock your PC.

Finally, in the section under Flash Drives, ensure that the correct USB flash drive is selected. When you're done, click "Create key" and then OK.


Step 4: Predator will exit. When it does, click the Predator icon in the taskbar to restart the program. A few seconds later, the icon will turn green, alerting you that Predator is running.
Every 30 seconds, Predator will check to see that your USB drive is plugged in. If it isn't, your computer will dim and lock down.
Here are some extra tips: 

  • To pause Predator at any time select "Pause monitoring" from the taskbar menu.
  • If someone tried to access your PC while it was locked down, you'll see the activity log when you log back in. You can see the log at any time by clicking "View log" from the taskbar menu.
  • Predator's Web site has several cool how-tos, including one that shows you how to program your computer to take a snapshot each time someone tries and fails to log in to your computer. Check it out.
One obvious flaw comes with this setup: you'll always be down one USB port. But if you're sold on Predator, consider purchasing a USB hub to compensate.


Saturday 19 May 2012

How to copy files to Google Drive faster in Windows 7

Google Drive desktop 

The Google Drive desktop application in Windows 7 creates a nice little shortcut in your Favorites folder for easy access to your files. Using Windows Explorer, you can copy files to it like any other file or folder in Windows. But there's a faster way to copy files to your Google Drive account. Using the Send to context menu option, you can right-click on any file or folder and send it straight to your Google Drive folder. Here's how to set it up:

Step 1: Make sure you have the Google Drive desktop application installed on your Windows 7 PC.

Step 2: Open the Run dialog box by hitting Win+R, then type: %APPDATA%\Microsoft\Windows\SendTo and hit OK.

Open Run to locate SendTo folder 

Step 3: When the SendTo folder opens, right-click on the Google Drive icon in the left pane, under "Favorites," and drag it over to an open area of the SendTo folder in the right pane. Don't drag it onto one of the shortcuts already in the folder, or else you'll get the wrong menu for Step 4.

Move shortcut to SendTo folder 

Step 4: After you let go of the icon in the SendTo folder, select "Create shortcuts here."

Create Google Drive shortcut in the SendTo folder 

Step 5: To copy a file or folder using the SendTo context menu, right-click on any file or folder in Windows Explorer, then go to "Send to" and choose Google Drive.

SendTo Google Drive 

That's it. Now you can send files to your Google Drive account in Windows by right-clicking on any file or folder. To select multiple files, just press the Ctrl key as you highlight the files you want to send.


Friday 18 May 2012


According to The Economist, the average American consumes almost eight 40-foot trees per year in paper. Even if you're not environmentally minded, reducing the amount of paper you consume has many benefits, including saving money and reducing clutter. 

To help you get on the path to living a paperless lifestyle, here are six tips to consider:

Switch to paperless billing
If you're still getting paper bills in the mail, consider switching to paperless billing. Many companies, banks, and utilities offer paperless billing options. The bills will typically be in PDF format, which you access online. When the new bill is available, you'll usually get an e-mail or a text message alert. E-bills will save you from having to scan the bills yourself and shredding them.

PDF file icon

Download PDF manuals
More and more companies are offering PDF manuals and user guides for everything from digital cameras, TVs, to furniture. If you save your manuals, find the PDF versions online, then recycle the paper ones. PDF manuals are much easier to find on your computer than trying to remember where you kept the paper manuals.


Scan your documents
Scan any paper documents that aren't available in electronic form and any old documents you've held on to. If you have a multifunction printer (all-in-one), put the scanner to good use. Many multifunction printers come with software that automatically converts your scans to PDF files. For large and frequent jobs, consider getting a multifunction printer with an automatic document feeder or a dedicated document scanner. You can also scan receipts and business cards on the go, with your smartphone.


Print to PDF
If you want to print something interesting on the Web, like this how to, save yourself some paper and ink by printing it to PDF. There are a lot of free PDF printer programs available and if you use Google Chrome, it has PDF printing built in.

Dropbox

Access PDFs from the cloud and on devices
Going paperless means having a lot of PDF files on your computer, but they don't all need to be locked away there. You might want to store some PDFs in the cloud, to make them more accessible. Cloud services like Dropbox, SkyDrive, and Box let you access your files from multiple devices, from almost anywhere. And if you've got a Kindle, you can always send your PDFs to your Kindle as well. As CNET's Stephen Shankland suggests, using Dropbox is a great way to view PDF files of subway maps and boarding passes.


Sign documents electronically
One of the annoyances of electronic documents is that sometimes, you actually have to print them. Documents that require signatures are one reason why. If you've got a smartphone or tablet, however, you can forgo this process by using apps designed to allow you to sign them with your finger or stylus.


Thursday 17 May 2012

Understand your home network settings

Home networking is almost everywhere these days, and most of us have had to learn the basics the hard way. Lost connections, hacked passwords, and interminable calls to customer support can all cause headaches, and while there's no foolproof way to avoid any of them, it's still true that knowledge is power. I'll cover the basics of networking and show you how to change your settings.
 
You and your router
Your router is a piece of hardware that takes the internet connection provided by your Internet service provider (ISP -- the company you pay every month) and splits it up, or "routes" it to different devices using wires or Wi-Fi. You'll need to access the router in order to tweak your network settings. There are far too many brands and models for me to try to explain them all in detail, but they do share quite a bit in common. Just remember that you may encounter slightly different terminology or tools; if you get lost, check with your router's manual, online help, or -- if you're really stuck -- customer service line. 


Presumably, you've already set up your router using the manufacturer's instructions and information provided by your ISP. You'll need to dig up those instructions and information, so if it's not available, check online or contact customer service for a refresh. Just tell them you're setting up your router and they'll tell you what you need to know. 

Most modern routers use Web-based administration tools, so fire up your favorite browser and direct it to the address that came with your router. (Two common addresses are 192.168.1.1 and 10.0.0.1, but yours may be different.) You'll need to supply a username and password; again, this should be supplied by the router's manufacturer, but if you can't find it or you changed it and then forgot it, you will need to reset the router to its factory settings, but you should really only do this if your network isn't running properly, as it will require you to run through the setup procedures all over again. 

Basic network settings
Once you've accessed your router, you can explore your options. You can access these settings in your router's menu typically by selecting Internet settings, Basic settings, or something similar.

Your IP (short for Internet protocol) address is kind of like a phone number -- it's a unique identifier. Some ISPs provide users with their IP address dynamically, and it can change from time to time as users disconnect and reconnect to the network. Other ISPs provide users with locked-in IP addresses; these should be entered when setting up your router and shouldn't change. The same is true for the subnet mask and gateway IP address, each of which are used to connect to your ISP. 

If your IP address is like your phone number, your DNS (domain name server) addresses are like phone books. ISPs usually provide you with two or three to enter as you set up your router, but there are now many other free DNS options -- see how to find out of one of these could work better for you here. 

The MAC address is a unique identification number attached to networking hardware, somewhat similar to a serial number. You shouldn't have to change this unless you get instructions from customer service to do so.

Security
Basic network settings.


There are two layers to home network security: Keeping unauthorized users from accessing your internet connection and protecting the machines connected to your network from outside intrusion. 

If your network is all wired, you should have no problem with unauthorized access to your connection (unless someone sneaks in and plants a cable while you're out, but this isn't a common problem). Wireless password protection is key to keeping wireless users from poaching access and potentially getting you in trouble with illegal activity. Your best bet is to use a long string of random characters, as most devices just require one-time entry for network passwords. You should also change it frequently, especially if you live in a dense neighborhood or suspect that a neighbor may be trying to crack your security. Changing it is simple; just select Wireless setup or Wi-Fi settings and change your password from there. If you've never changed it from when you first installed it, do so now. 

All open networks are vulnerable to intrusion, and yours is likely no different. Most routers come with built-in firewalls, which are barriers to outside access. You are almost certainly better off leaving your router's firewall settings alone, unless if you hear otherwise from a customer service representative from your ISP. 

Connecting computers and other devices
Of course, the router's main purpose is to connect your computers and other devices (like game systems, smartphones, tablets, and so on) to the Internet. Most use DHCP (dynamic host configuration protocol) to assign local IP addresses to the devices on the network, and this works pretty well for most uses.


Sometimes, though, it's better to have one device (like a networked printer or hard drive) use the same local IP address at all times. Different routers use different language to access this feature, but it's not so hard. Look for LAN settings, Local Network Settings, DHCP Settings or browse through your interface until you see DHCP or Address Reservation or something similar. If in doubt, check the manual or customer service before making changes. To add a permanent address to a device, you'll need to find that section in your interface, then select Add device or whatever your router says. This should bring up a list of devices connected to your router, and it may take some effort to figure out which one is the one you want. Computers are usually pretty straightforward, but your best bet is to check the network settings of the device to see what its MAC address or current IP address is, as that should be unique. Select that device, then add a permanent IP address and a nickname to help you remember it in the future. 

DHCP and address reservation.


Those are the basics of home networking. Of course, there's much, much more you can do, but this should help with basic security and connection issues.


Wednesday 16 May 2012

Automate Windows maintenance tasks

It can be hard to remember to take care of your computer's maintenance in a timely fashion. Microsoft Security Essentials is great for virus and malware protection, but removing old files and registry entries can be a pain. DMaintenance performs basic maintenance tasks and can bundle in third-party software so you don't have to remember every last thing. Here's how it works:

  1. Download DMaintenance here.
  2. The first time you run it you will see the configuration screen; if you ever want to tweak DMaintenance again, you will need to type open the Start menu, type "Run," then type "dMaintenance.exe /config" (without the quotes).
  3. When entering your configuration options, stick with what you're comfortable and familiar with. Deleting temp files and disabling IE toolbars are pretty straightforward, for example. One nifty option is to have DMaintenance send you an e-mail when it's all done, including PC Health Status info and additional reports.
  4.  
  5. To add third-party software to the automation queue, click the button on top labeled Custom Applications. Choose from the apps on the left, then click the Download 3rd Party Apps Now button if you don't already have them installed. You can also add custom adds on the right; you will need to configure each using the Custom Apps Config button beneath the list.
  6. There's always a catch. You will need to remember to run DMaintenance regularly, but at least it's a one-step process. If you like, you can access Windows' Task Scheduler from the Control Panel (through System and Security, then Administrative Tools) to automatically run DMaintenance, but if you're comfortable with the Task Scheduler, you may not need DMaintenance at all.

Tuesday 15 May 2012

How to clean the inside of your computer

Heat is your computer's worst enemy. Over time, dust buildup inside your computer could undermine its cooling efficiency, resulting in shorter life spans for your computer's components. To help keep your computer running cool, clean the inside of your computer every 6 to 12 months. Here's how:

Step 1: Turn off your computer and unplug it from the electrical outlet or surge protector. 

Step 2: Open up your computer's case. 

Corsair Special Edition White 600T inside

Step 3: Using compressed air, dust the internal components of your computer with short bursts of air. Try to remain at least a few inches away from the surface of the motherboard, memory, processor, and expansion cards. 

Step 4: Remove the dust buildup on your case fans with a can of compressed air. Hold the fan with your finger to keep it from spinning while you're blowing the compressed air onto it. Fan blades can be delicate and may crack if spun too quickly. You can use rubbing alcohol and wipe the blades with a cotton swab for the finishing touches. If the fans are hard to reach or extremely dirty, feel free to remove them from the case for easier cleaning.

Inside computer 
Step 5: Remove the dust buildup from the power supply using a can of compressed air. If your case has a dust filter underneath the power supply, be sure to clean the filter too. 

Computer power supply 

Step 6a: The heat sink and fan that's mounted on your processor should be cleaned as well. Again, with a can of compressed air and using short bursts, blow the dust away from the heat sink and fan. If the buildup is too heavy, you may need to remove the heat sink and fan from the processor to get it thoroughly cleaned. Just remember to clean the thermal grease off of the processor and the heat sink, then apply new thermal grease before reattaching the heat sink to the processor.


Heatsink and fan 
 
ArctiCleanStep 6b: To remove the thermal grease, moisten a lint-free cloth with 99 percent isopropyl alcohol, then wipe away the thermal grease from the processor and the heat sink. Less concentrated alcohol will also work but may leave a residue that could reduce the efficiency of the thermal paste or grease. A commercially available thermal material remover, called ArctiClean, can be used instead of the isopropyl alcohol, and coffee filters can be used instead of a lint-free cloth. 

Step 7: Finally, dust off all the ports on the computer with compressed air and clean all the exterior vents with rubbing alcohol and a cotton swab. 

That's it. If you keep your computer on the ground or on carpet, try to remember to clean your computer every six months or so. If your computer sits on a desk, yearly intervals should be fine. An easy way to remember to clean your computer is to schedule a cleaning at the same time as when you get your teeth cleaned. You do go to the dentist, right?


Blogger Gadgets